Browsed by
Category: summer

customer love – Chefs For Farmers

customer love – Chefs For Farmers

You know the feeling when you realize you forgot to do something? Um, yeah …we had an amazing customer a while back who shared some gorgeous photos, and I completely forgot to share them with you. So …Chefs For Farmers!

BBQ Banquet in an industrial modern space

Chefs For Farmers is an organization that brings “chefs, artisans and culinary influencers together to celebrate supporting local and regional farmers”, and their event decorator contacted us at the last minute to see if we could help decorate their banquet – our answer? Yes, of course!BBQ Banquet for Chefs For Farmers

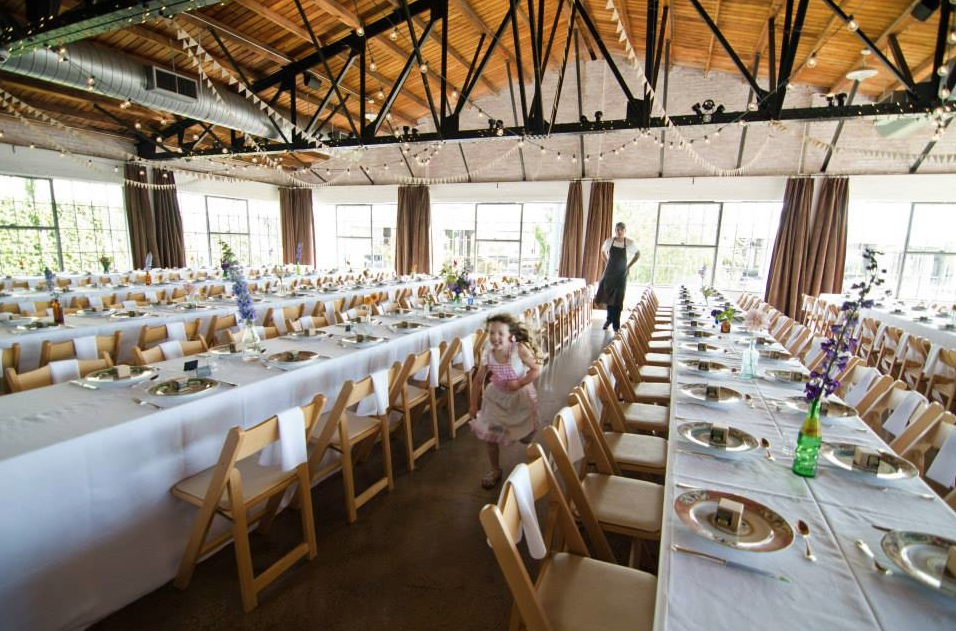
They were kicking off their season of celebrations, and needed lots of bunting style garlands to add drama and texture to their modern industrial style venue. The planner needed something that was classy but also rustic, and she decided to use our Vintage Book Triangle Garlands in extra long lengths to mix in with some cafe lighting and twinkle lights -the final result was amazing!modern industrial feteI love how the individual elements she used for the event – white cloths, wood chairs, flowers in glass bottles, kraft paper, string lights and bunting – are all so simple by themselves, but when they’re put together create a sense of refined, industrial drama. Gorgeous!

Chefs For Farmers kick-off dinner

The bunting style garlands are amazingly versatile, working in rustic and classic venues alike {and, because they aren’t event specific, they can be reused for other occasions!}.

Thank you to Chefs For Farmers for the photos – the event was such a feast for the eyes, and it looks like it was for the stomach as well! {more photos of the lovely event here}

<3


Items featured:

Vintage Book Paper Triangle Garland

Summer Crafts: Ice Painting

Summer Crafts: Ice Painting

(I wrote this post at the end of July and am just now getting around to publishing :D)

Around here it has been wet and warm this Summer, which put together makes for hot, steamy days! Hot, steamy days can lead to the kids being just as cooped up inside as rainy ones, so we have been coming up with some ideas to help them stay out (and cool) as long as possible, one of which is Ice Painting. It is super easy (you could probably figure out how to do it by simply looking at one of these photos!), entertains kiddos for quite a while and is also (nearly) free – a triple win!Summer Crafts for Kids: Ice Painting | the Path Less Traveled They love any craft that involves painting, and could spend hours coloring on the sidewalk, so I combined both!Summer Crafts for Kids: Ice Painting | the Path Less Traveled It is quite simple, really, only involving a bit of forethought on the part of the parent. :)Summer Crafts for Kids: Ice Painting | the Path Less Traveled

You will need:

an ice tray

water

food color

paper (optional)

paintbrushes (option)
Summer Crafts for Kids: Ice Painting | the Path Less Traveled Fill the ice tray with water and add a few drops of coloring to each well. I used two trays and made about eight different colors for this project. Put the trays of colored water in your freezer, and wait! Summer Crafts for Kids: Ice Painting | the Path Less Traveled Once the ice has frozen, spread out some papers (I used a length of white butcher paper) on a table or concrete (we used our patio – a driveway or sidewalk would also work well) and add the colored ice cubes to it. I also supplied some small paintbrushes and encouraged the kids to rub the ice around, “painting” with the trails of colored water it left.

Summer Crafts for Kids: Ice Painting | the Path Less Traveled

Much fun was had by all! Now that the weather is starting to cool again, I’m imagining that using the colored ice cubes in a warm bath would be equally fun. :)

customer love – American theme party!

customer love – American theme party!

Sometimes your custom order requests are just the little extra “push” we need to create a new product, and sometimes we end up loving the new thing so much that we carry it full time in our shop.

This a story of one of those things. :) We started offering our Hanging Paper Stars {see them here} about 3 years ago, and found that many of you really enjoy using them for your events and in your homes! However, because they are large and a bit fragile, they have been a total bear to ship, and the shipping fees can be a bit high. So, John and I have talked on and off about creating a DIY Kit version of the stars with the idea that you would be able to purchase all of the materials needed, all of them pre-folded so that you would only need to assemble them {meaning, very little skill required!}. But life was busy, the shop was growing quickly, and it was something that kept getting set aside for “when things slow down”. Until – someone in Australia emailed to ask about possibly getting 12-20 of the white stars!

American themed party decor | the Path Less TraveledShe was in charge of her corporate Christmas party, and they wanted to have an American theme to it – and have a bunch of our stars hanging from the ceiling! We knew that shipping that many of the stars to Australia {a location where shipping fees from the US were already high} would cost an enormous amount, and realized that this was the push we needed to finally get the kits made.

American themed party star garlands and decor | the Path Less TraveledThe gal sent us these photos to share after the event, and it looks like it was a terrific party! She also used our Red, White and Blue Stars Garlands in custom 60 foot lengths to string across the space, bunches of our Red, White and Blue Star Dessert Toppers in little glass vases as centerpieces on the tables and our Star Cupcake Picks in Patriotic Colors to top the desserts – it all came together so well!
Servers in costume at a Vintage America theme party | the Path Less TraveledSo there you have it! An idea that was stuck in the concept phase for far too long was brought to life {and now is a top seller! you can find them here} by a customer’s special request. You guys really are what keep our little shop going, in so many ways!

Do you have photos that you’d like to share? If so, you can either email them to me at elizabeth@pltmarket.com or tag them with #thepathlesstraveledmarket on Instagram – we’d all love to see your ideas! Also, I often send “thank you” coupons to the lovelies who let me share their photos with you – so if you’re looking for a coupon for your next order, sharing photos is a great way to get a discount!


<3

Items featured:

Large Folded Hanging Paper Stars

DIY Hanging Origami Star Kits

Red, White and Blue Stars Garlands

Red, White and Blue Large Stars Garlands

Red, White and Blue Star Dessert Toppers

Star Cupcake Picks in Patriotic Colors

{this moment}

{this moment}

(meant to post this last week, but life moves on …)

inspired by SouleMama:

“{this moment} – A Friday ritual. A single photo – no words – capturing a moment from the week. A simple, special, extraordinary moment. A moment I want to pause, savor and remember.”
strawberry scones

strawberry scones

If you’ve ever had your scones turn out heavy and rather unappetizing, you  might be thinking “hm, those look good but I can’t make them”. You can. I did. And they are sooooo light and creamy! I found the recipe over on Annie’s Eats (I really love her recipes!) and have made it over and over.

The main difference between this recipe and the other ones I have tried (and I have tried many) is that is calls for yogurt instead of cream or half and half. Maybe that’s what makes them so good?
These also freeze really well!


Strawberry Scones
Ingredients:
1 large egg
¼ cup plain or vanilla yogurt
½ cup milk
1 tsp. orange or lemon zest [I’ve been using orange and it tastes wonderful!]
2¼ cups all-purpose flour
¼ cup sugar, plus more for sprinkling
1 tbsp. baking powder
½ tsp. salt
8 tbsp. cold unsalted butter, cut into small pieces
1 heaping cup diced fresh strawberries [I use thawed frozen berries because they are cheaper – and because I usually have some on hand]

Directions:
In a small bowl, whisk together the egg, yogurt, milk and citrus zest until blended; set aside.  In the bowl of a food processor combine the flour, sugar, baking powder, and salt.  Pulse briefly to blend.  Add the butter pieces to the bowl with the dry ingredients and pulse several times to cut the butter into the flour, until the largest butter pieces are the size of small peas.  (If you don’t have a food processor, you can just as easily mix up the dry ingredients in a mixing bowl and cut in the butter using a pastry blender or two knives or forks.)  Transfer the mixture to a large mixing bowl.

Add the strawberries to the flour mixture and toss to coat.  Add the wet ingredients to the bowl with the dry ingredients and gently fold together with a fork or spatula until a sticky dough has formed.  Knead just a few times to ensure that all the dry ingredients are incorporated and the dough is cohesive.  (Only if absolutely necessary, add more milk 1 tablespoon at a time to hydrate the remaining dry ingredients.)
Transfer the dough to a well floured work surface and pat into a disc about 7-8 inches in diameter.  Sprinkle lightly with additional sugar.  Slice the disc into 8 wedges.

To bake the scones, preheat the oven to 425˚ F.  Line a baking sheet with a silicone baking mat or parchment paper.  Place the shaped scones on the prepared baking sheet and bake until lightly browned on top, about 15 minutes.  Let cool a few minutes before serving.

To freeze, transfer the baking sheet with the shaped scones to the freezer and let them chill until they are firm, 30-60 minutes.  Wrap the scones individually and store in a freezer-safe bag until ready to bake.  Bake as originally indicated, adding a few minutes to the baking time (usually about 18-20 minutes for me.)

yesterday evening

yesterday evening

I am beginning to learn that it is the sweet, simple things of life which are the real ones after all.”

-Laura Ingalls Wilder


Yesterday evening was a quiet time, just the four of us enjoying playing and being together. John sent me outside to take a walk after Emma was down. He stayed with Ian, and I took a stack of letters to the mail box.
It was a bit sticky outside (it seems to hardly ever be dry during July/August), but cool enough to be pleasant. And so pretty.
I’m so glad John told me to go out.
There is something about being out of doors that is refreshing for me. And John knows this.

As I walked I decided that when I get old I want to be the old lady on the street who has the garden that is overflowing with a profusion of old-fashioned flowers.
I want to spend my time tending it, being with my family, building into their lives and the lives of the younger women around me. 
I want to wear the slightly funky but ever so lady-like clothes.
I want to have pretty dishes to use everyday, especially when others stop in for coffee and something sweet.
In my old age I want to celebrate and enjoy the simple and sweet things that make up the days.
And if it is going to happen I need to cultivate that contentment and joy now.