Browsed by
Category: tutorial

How-Tuesday #1 – Christmas sewing re-cap, part 2 (a.k.a. DIY lace onesie)

How-Tuesday #1 – Christmas sewing re-cap, part 2 (a.k.a. DIY lace onesie)

Have you ever noticed that Etsy has a regular feature on their blog called “How-Tuesday“? If you haven’t, you’re in good company – it took me a while to notice, as well. :) Anyway, I really like the idea of a weekly {or semi-weekly? hm, might need to figure that one out still …} how-to” post. I hope Etsy doesn’t mind me copying their little play on words title :)

Last time when I posted the sewing re-cap, I told you about the little plaid skirts that I made for the girls to wear on Christmas. This time, I’ll tell you about the darling little onesie that I embellished for Olivia. {some of you saw the preview of it on Instgram :)}

So, one day I was sewing up orders – sewing, sewing, sewing, and starting to get a bit bored needed a change of pace. :) I’ve had a few pieces of vintage lace pinned to my ideas tack board for a while {I used one of the pieces for Olivia’s burp cloths} and decided to girl-ify one of her plain long-sleeve onesies. Every girl needs some lacy things, you know :)

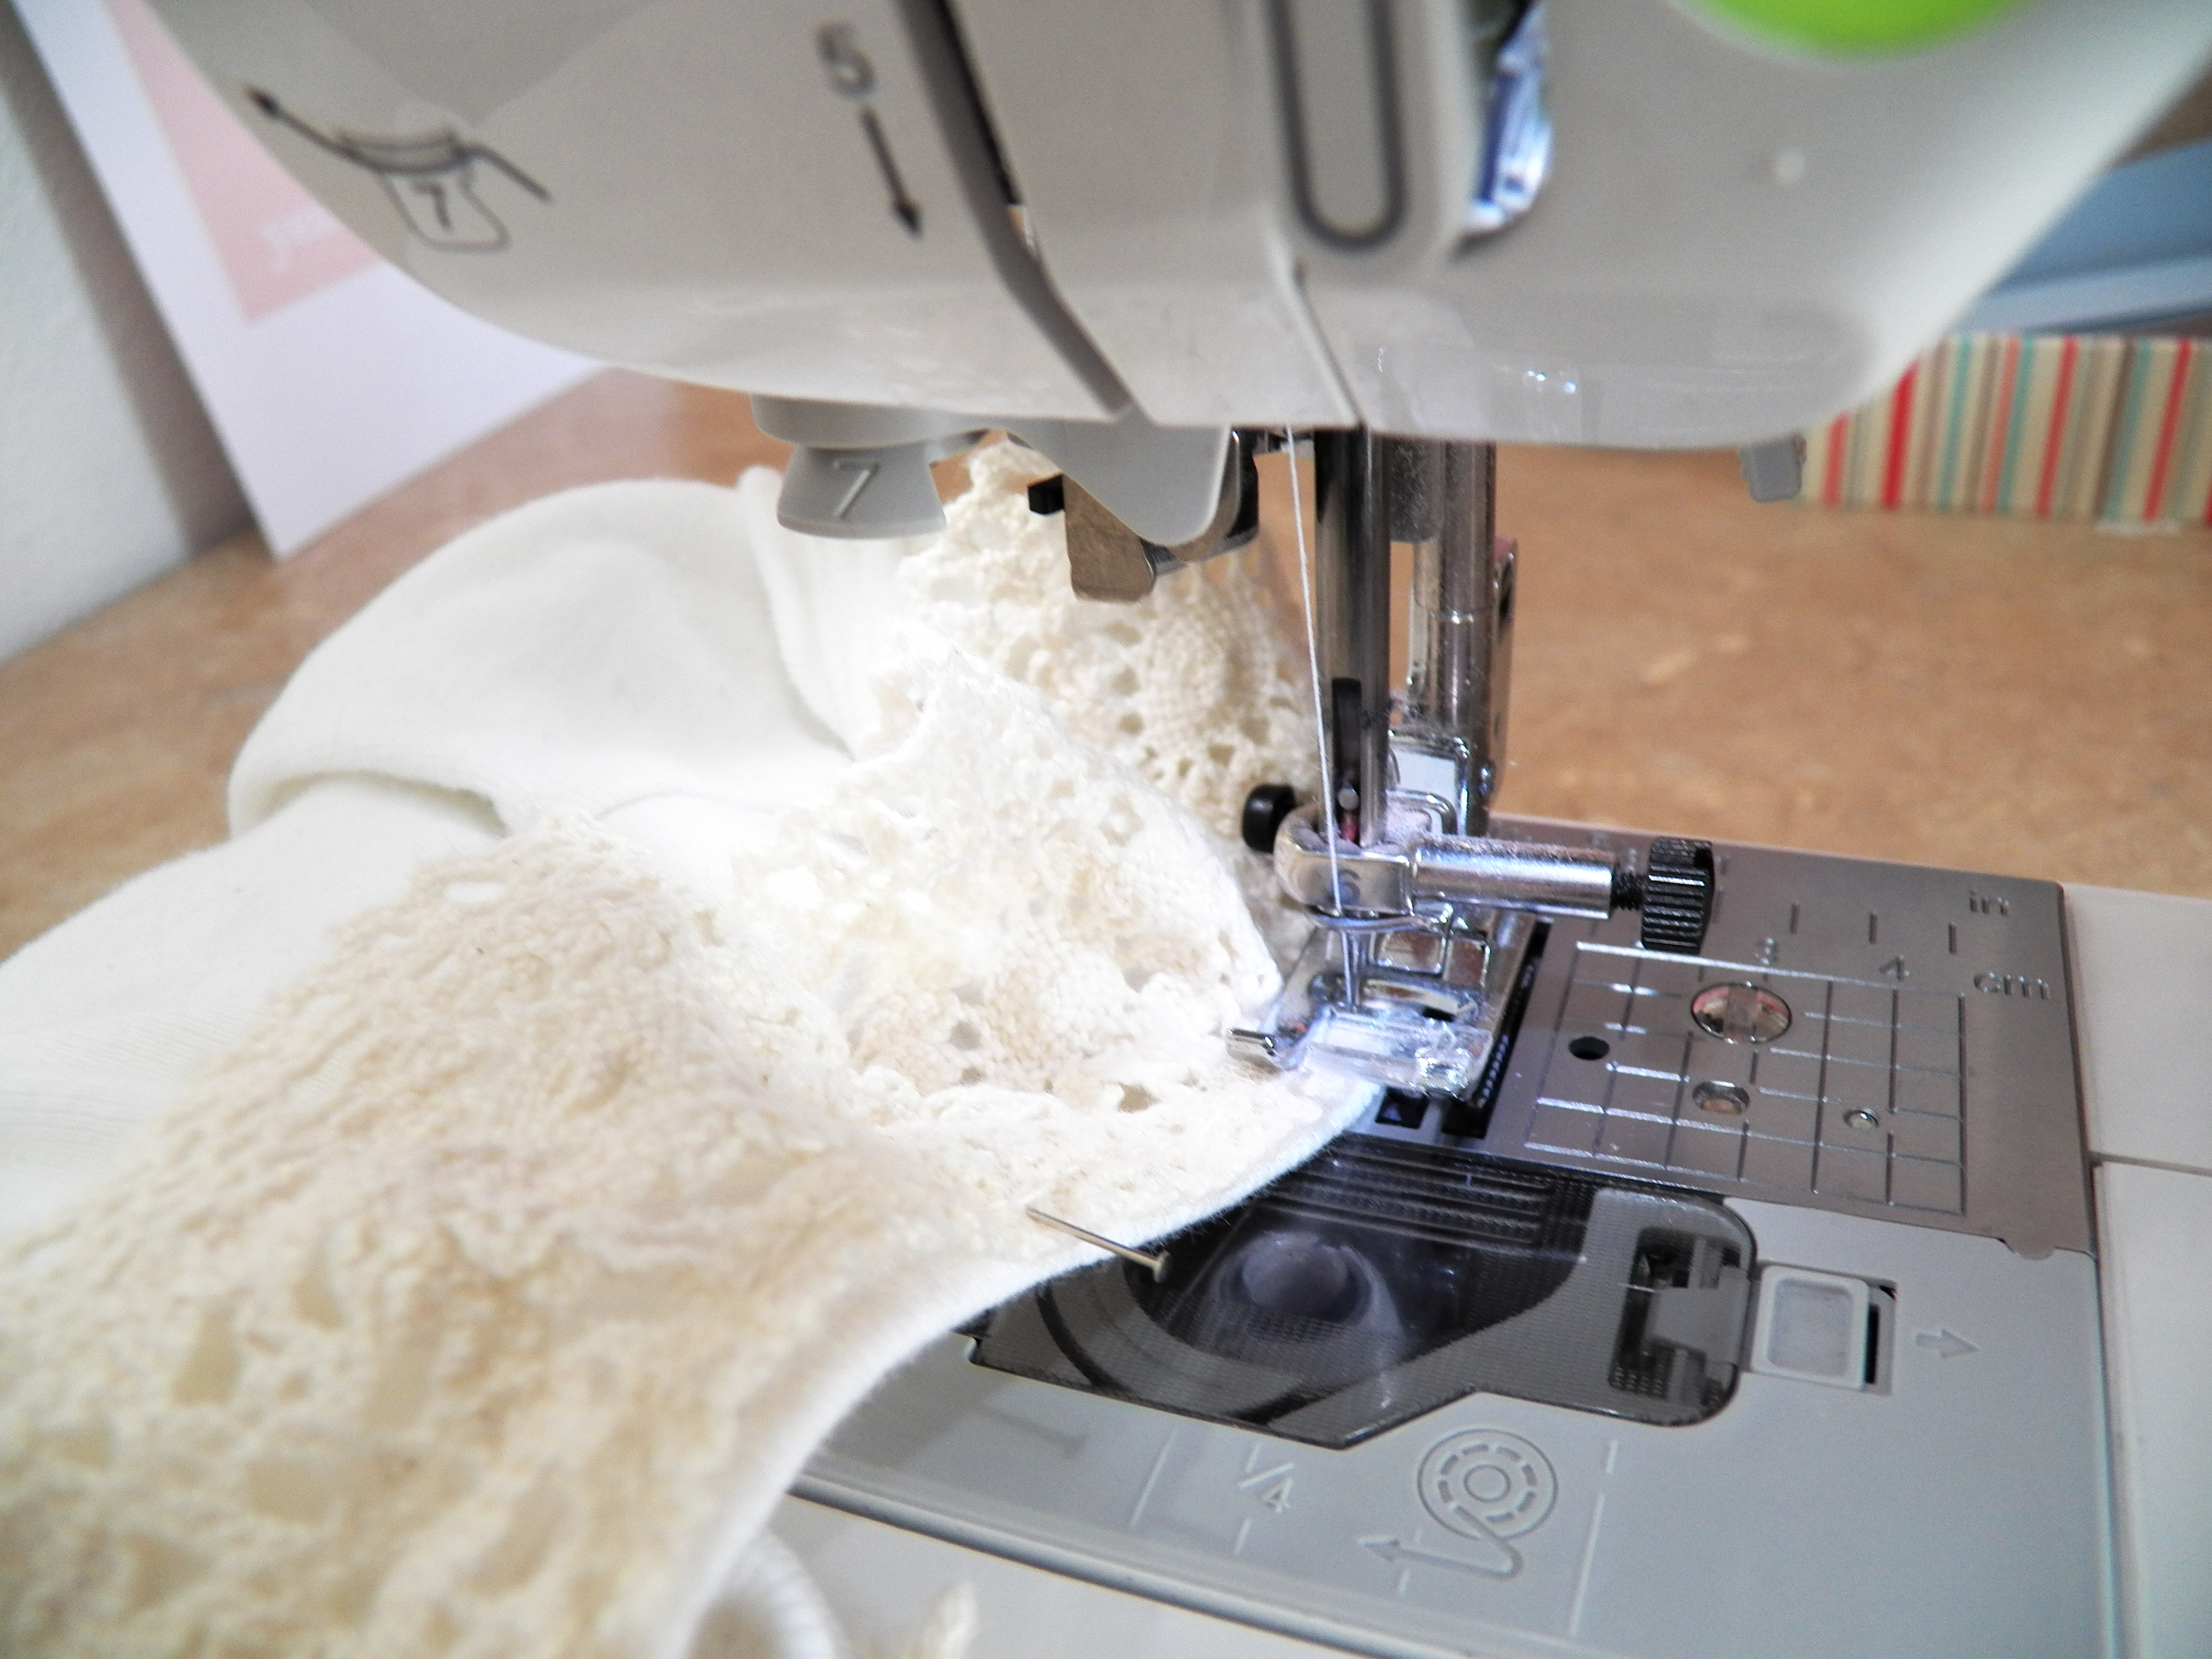
It ended up being quite simple and quick, so quick that I didn’t even think to take photos of the project until I was mid-way though! To start, I laid out the onesie, and laid the lace along the front neckline to figure out if I could use the entire piece or {gasp!} would need to cut it. It was a few inches too long, so cut I did. The little scrap of lace that was left over got re-pinned for another project on another day :)

Next, I pinned it along the front neckline and lined it up in the machine. Once it was all set, the sewing went quite quickly – just a quick little line of stitching right up on the edge and it was complete!

Darling, yes? But wait, you haven’t seen the cutest part yet …

2013-01-11 12.35.19

Oh my, too much sweetness!

So, there you have it – the first How-Tuesday. I’ve already got ideas for the next one … ;) Is there anything that you’d like to see?

Don’t forget to enter the giveaway for the Valentine bundle – we’ve been getting some great feedback on both the garland and the cupcake toppers and I know you’ll love them if you win! They’d really add the perfect touch to your home for Valentine’s Day, or be a sweet gift <3

handmade Christmas, part I

handmade Christmas, part I

I made a dozen tea towels to give as gifts this year to, well, some of my loved ones (you know who you are already, so what am I trying to hide?). :)
They were so much fun to make, and so pretty that I’m thinking of keeping a few for myself!

I meant to post these and the tutorial right after I finished making them two weeks ago. Really, I did.
But you still have time to make some too, if you’d like!

To make them I used:

  • 6 cotton “flour sack” towels, 30″x30″
  • a bag full of ribbons and trims that I’ve been saving
  • sewing scissors
  • iron and ironing board
  • my sewing machine

I cut the towels in half the long way to end up with 12 towels that were 15″x30″.
Then I pressed them, ironing out a bunch of the wrinkles and pressing a hem on the raw edge.
Next I sewed the hem on the raw edge, making them finished on all four sides.

I have a bag full of short ribbons and miscellaneous trims that I’ve been saving and I spent an hour or so sorting through it looking for just the right combination of ribbon and trim for each of my loved ones (making them so cute and personal). That was the most fun out of the entire project!

The last step was sewing the trim on to the towels. Once that was done, all that was left was to wrap them up!

I’m linking this at these blogs – check them out for some terrific Christmas ideas!


wall words

wall words

Have you seen some of the amazing things that people have been doing with vinyl stickers on their walls? I’ve been loving them and have so many ideas of ways that I could use them too. But, if you’ve been reading a while, you know that I am really really cheap  frugal, and would much rather make a knock off than pay for something.

I have been wanting to put a word or phrase in the little empty space in the middle of this picture grouping for a while and finally did it the other day.

I gathered:

  • a pencil,
  • soft erasure,
  • watercolor paints (the really cheap dollar store kind that come with a plastic brush),
  • cup of water and white saucer,
  • and a moist rag,

all of which I already hand on hand – so this project cost absolutely nothing!

My first step, after determining what I wanted to write (and making sure that Emma was napping so she wouldn’t see me writing on the wall), was to pencil in the lettering.
I’m not quite confident enough to just take a paint brush to the wall, even though I would have been able to wipe it clean and start fresh if if didn’t turn out just right so the pencil allowed me to adjust the spacing and height of the letters a bit, and stand back and look before I comitted to using the paint. At this point you can erase the letters completely if you decide that it’s not the look that you’re going for.

The second step was to mix the paint. I used a sepia toned brown that I made by mixing a bit of black and brown in the white saucer. Once I was happy with the color I moved on to the third step which was start painting!
My hand shook a little at the beginning, but I used the damp cloth to ease out any squiggles and just kept moving.
I kept adjusting and adding paint here and there to darken it as I went, and then after a bit stood back to look. It turned out great!

I really love the way it looks, and especially love that it was free! Also, A Little Nick Nack is hostessing a giveaway of some of my things – you might like head on over and enter :)

I’m linking this over on some of these fun blogs – head over and check out what others are posting!

Scallop Garland Tutorial

Scallop Garland Tutorial

Remember the garland tutorial that I mentioned a few days ago?

Well, it’s about to start – 3, 2, 1 …….0.


The first garlands that I made were white, but I used a really pretty orange for this tutorial because, well, it’s pretty. And it shows up better in indoor pics than the white did.

First, cut (or tear) a few 1″ strips of fabric.
Fold each strip in half, in half again and again and so forth, until there are 12 layers (I found that 12 was about all that I could cut through).
Cut your stacks of strips into 1 1/2″ sections.
Trace a half circle onto the top layer. I used a spool of thread for this one, but I’ve used other things too.
And then, cut ’em out!

Next, you’ll need your pile of half circles, 2 6″ strips of ribbon, thread and scissors. And a sewing machine. That really helps too.

Take one of the ribbon strips, fold it in half and lay it on top of one of the half circles.
Lay another half circle on top of this stack, sandwiching the ribbon between two pieces of fabric.
Run this stack through the sewing machine and line continue to sew the half circles, making a line of scallops as you sew.
When you have achieved a length that you are happy with, make another fabric and ribbon sandwich and feed it through the machine, back stitch and cut the thread.
That’s it!

What do you think, want to make one too?

 I’m linking this at some of these blogs – head on over and check ’em out!

bench cushions

bench cushions

The sewing machine has been put away for the past month and a half. It wasn’t really broken, but there was a rather crucial part missing (Emma was trying to be “helpful” and it got thrown away).
Unfortunately, you just can’t go to the fabric store and ask which aisle the shuttles for Brother sewing machines are on! My Grammy-in-law very kindly gave me the name and number of a dealer that she uses, and now we are back in the swing of things. :) And a good thing, too, since my “ideas file” is starting to get pretty long!


The first thing at the top of the pile was covers for the bench cushions.
John made this bench and proposed to me on it, and right now (since we are living in a ~900 sq foot apartment) it is serving duty as our couch. I had bought the cushion inserts from Ikea with some birthday money, had measured and cut out the material that had been used in practically every room for some purpose or another, and pulled out the machine only to find it inoperable. :) Ah well, we’re finishing now!

I cut three pieces for each pillow:
1 26″ x 26″
1 26″ x 22″
1 26″ x 8″

Next, I sewed a 1″ seam down one of the 26″ sides of both of the smaller pieces (this would create a finished pocket-style opening).

Then I stacked the large piece with the middle-size on top, right sides together and raw edges matching on three sides …

… with the smallest piece on top, overlapping the finished edge of the mid-sized piece. I pinned them all together and sewed around the edge using a 1/2″ seam.
Since I wanted a really rumply and relaxed look, I didn’t bother to clip the corners or press the seams.

For the last step I put a button and button hole in the middle of the edge of the pocket opening (I was using a rather slippery type of upholstery fabric. If you use some a little stiffer or less slippery, you might be able to skip this) to keep the edges from gaping.

growing ginger

growing ginger

I love the flavor of ginger. Something about it just seems so “homey” to me, and at the same time it can be fresh and a bit exotic, too.

the ginger tuber that I “harvested”

I have been wanting to use fresh ginger in recipes for a while now, but was hesitating to buy it because I knew I wouldn’t use it all and the rest would go bad. And I couldn’t stand the idea of buying something (that’s not really in our food budget in the first place) knowing that I’d be throwing half of it out.

Last fall I finally took a few minutes to research (read, type it into Google) growing it myself. It’s surprisingly easy! As I was doing that I found that you can store ginger in the freezer, and that frozen ginger is actually easier to grate (now, isn’t that nice?). It also grows well in shady spots and indoors, quite handy since we don’t get any sun through our windows.

So I splurged a little and bought some.

one of the ginger stalks (it looks like bamboo)

I found that ginger tubers grow in a similar fashion to potatoes: instead of planting seeds, you plant “eyes”.
The article I liked the best was on eHow. The steps are simple and easy to follow.
Instead of planting the entire tuber, though, I cut it into inch size chunks and planted the ones with the most promising looking eyes on them and put the rest in the freezer to use in recipes.

10 months later, the stalks on the plant turned yellow and died off, just like the article said! I forgot that it was normal and that you are only supposed to harvest a little bit, so I dug it all up. But that’s okay – I just replanted some eyes, and in another 10 months I’ll harvest again! :)


homemade Moses basket

homemade Moses basket


After about a week of working on it, off and on, I finished Baby’s basket last night.

I’ve been wanting to have a Moses basket for our babies, but just haven’t been wanted it badly enough to fork over $70 (or more, depending on sales and the company I was looking at).

So, when I was walking through Walmart one day and saw this basket for $5 in their home decorating section, I decided to try to make/line my own. How hard could it be, right?

The first step (other than drawing up a pattern, which I figured I’d skip), was to figure out how to pad the bottom. I didn’t have any batting on hand (and didn’t want to spend any more money) so I folded one of the “rag” towels into thirds and laid it in the bottom. I traced the outline of the edge with a Sharpie and cut.

I sewed through the center of what was then a stack of three pieces of terry cloth to keep them from shifting.
Then I took some dark brown quilting weight material and made a sort of pocket that I slipped stack of toweling into. Sewed the end, quilted it, and the little mattress (of sorts) was done.


The first half was done, now to make the bumper!

-the layers of the bumper: inside, padding, outside-

I used material that I had in the closet for the bumper – more dark brown quilting weight and also some aqua and white seersucker from a blouse that had belonged to my Gramma.

This is the part that I really should have made a pattern for. If anyone reading this is thinking of making one, I’d really recommend doing a trial run with paper!
The bumper I made turned out really cute, just about 4″ too small! Also, I tried to sew the entire thing together and forgot that I need to turn it right side out! So, more stitch ripping but both mistakes were easy to fix.

For the inside I did a colorblock pattern with the brown on the ends and the seersucker in the middle. I used the rest of the towel for the padding, and the last bit of the seersucker for the outside.

I really love how it turned out, but next time I will make a pattern and plan how I’m going to turn it right-side out!

mobile for our little Ian/Kate

mobile for our little Ian/Kate

Before Emma was born I made a mobile to hang over her crib using a quilting hoop, some birds made from scrapbook paper and some thread. Well, this little one is getting closer and closer to arriving, and yesterday I realized that he (or she) was still lacking a personalized sleeping space.
I still had the other half of the quilting hoop in my craft stuff, so I used it to make another mobile.
I am really suspecting that this baby is a boy, but since we haven’t had an ultrasound I’m not absolutely positive (either way, we’re excited!). I decided to use brown and blue colored paper for the mobile, thinking that if Baby turns out to be a “she” instead of a “he” it wouldn’t be so masculine that I would need to remake it.
I used:
  • a quilting hoop
  • scrapbook paper
  • a circle punch
  • brown satin ribbon
  • glue
  • silk thread (I like using silk thread for projects like this because I find it is so much easier to tie knots with)

Since I had used the inside of the hoop for Emma’s mobile, the half that was left had the clasp sticking off the side. I really wanted to get it done yesterday without running out to the store, so I just bent the clasp pieces over, put a bit of glue between them, and wrapped the ribbon over it all. It worked pretty well!

Fold circles in half (I used 4 circles for each pendant),
add some glue and stick the pieces together.

I wanted the pendants to hang at an angle so that Baby will have a more interesting view when he’s staring up at them, so I poked the hole for the thread slightly off to one side of the center spine.

I made 7 pendants: I hung 6 of them around the rim of the hoop and the 7th I hung from the center of two threads that crossed the hoop at right angles.
Then I hung the whole thing from the ceiling. I really love how it turned out. :)

middle of the night inspiration

middle of the night inspiration

The idea for these little votive hangers came to me a few nights ago, during one of my (increasingly frequent) middle-of-the-night episodes of wakefulness. I think my average per night is up to three times now, and occasionally four. Just getting ready for those late night sessions with Little One!

I made something similar using mini jelly jars a while ago, but that night I had the idea to use some of the many glass votives that I have stashed here and there. (I suppose one could have too many votive holders, but I haven’t gotten there yet. Or maybe I’m not the type of person that can have too many?)

I used some 18 gauge aluminum wire in about 18″ lengths, and twisted it to make a ring that would hold the votive.

Then I took the loose end and wrapped it under the base, looped it around the ring and made a hanger. Twist the final loose end in place, and …

… that’s it!


Favorite%2BThings%2BFridaybig%2Bbutton.jpg

Mother’s Day Silhoutte

Mother’s Day Silhoutte


I saw this idea a while ago over on Prudent Baby and tucked it away in the back of my head to use for Mother’s Day.
The ladies over on Prudent Baby used the idea to make artwork from pics of Zoo animals, but I thought it might be a fun and different way to do the silhouette of Emma that I am trying to give to my mom each Mother’s Day. It turned out to be pretty easy (and fun! I haven’t messed around with water colors in a while!).
The hardest part was getting a clear profile photo of Emma. She was sooooooo busy that morning. :) I finally just turned on the TV and sat next to her with the camera, waiting for her to stop “telling” me about everything she saw and just “zone”.
Also, I didn’t have any watercolor paper on hand so I just used some heavyweight textured scrapbooking paper. It worked fine, but I think watercolor paper might have been just a little nicer. I’m sure Mom – Grammie – will love it anyway!
If you’d like one yourself, I have a listing for custom silhouettes over on Etsy.


I was about to toss out the scrap that I had used for the template and then decided to tape it up instead. Pretty cute! And I get to keep and enjoy it, too. :)