Browsed by
Tag: pink

Instagram bits

Instagram bits

the photos that I capture on Instagram are just little bits and pieces of our life, and it’s really interesting to see what moments I capture {and which ones I don’t} – of course, it seems as if {since I instagram from our iPad} I only capture the things that stand still. Which of course explains why Emma Grace, Ian and John don’t show up very often, but flowers, projects and Olivia do. :)

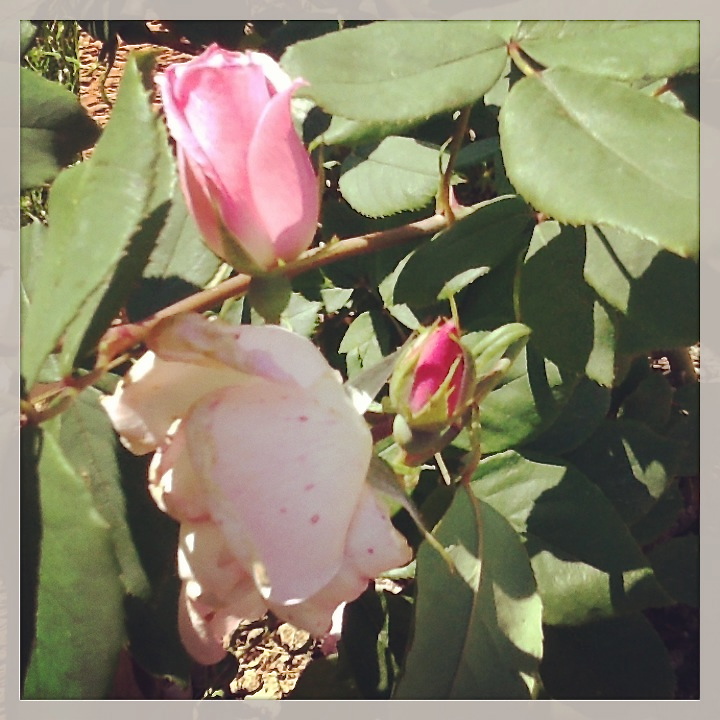
This week’s post is kind of a catch-up – so you get two weeks rolled into one. Enjoy!Mother's Day RosesMy Mother’s Day rose bush is looking so lovely <3 I’m a rose lover! Especially the soft colors – pink, white, even gray and soft purple – and the full, blowsy cottage types. :)
IMG_2416 I asked – and you answered! This storage dresser in the sewing room might be getting a do-over, and many of you chimed in with your color suggestions. Thank you!IMG_2421 A sweet color combo on the It’s A Girl! cupcake toppers – I normally stamp the girl version with pink ink onto either vintage or white paper, and this customer asked to add some pink on pink – they turned out super darling!IMG_2426 our darling baby being her sweet little self <3IMG_2431 It’s graduation season! These purple stars are the size I normally carry in the shop, and the large gold ones are coming soon!IMG_2433 a custom bouquet of “Congrats Grad!” and “Class of 2013” dessert toppersIMG_2441

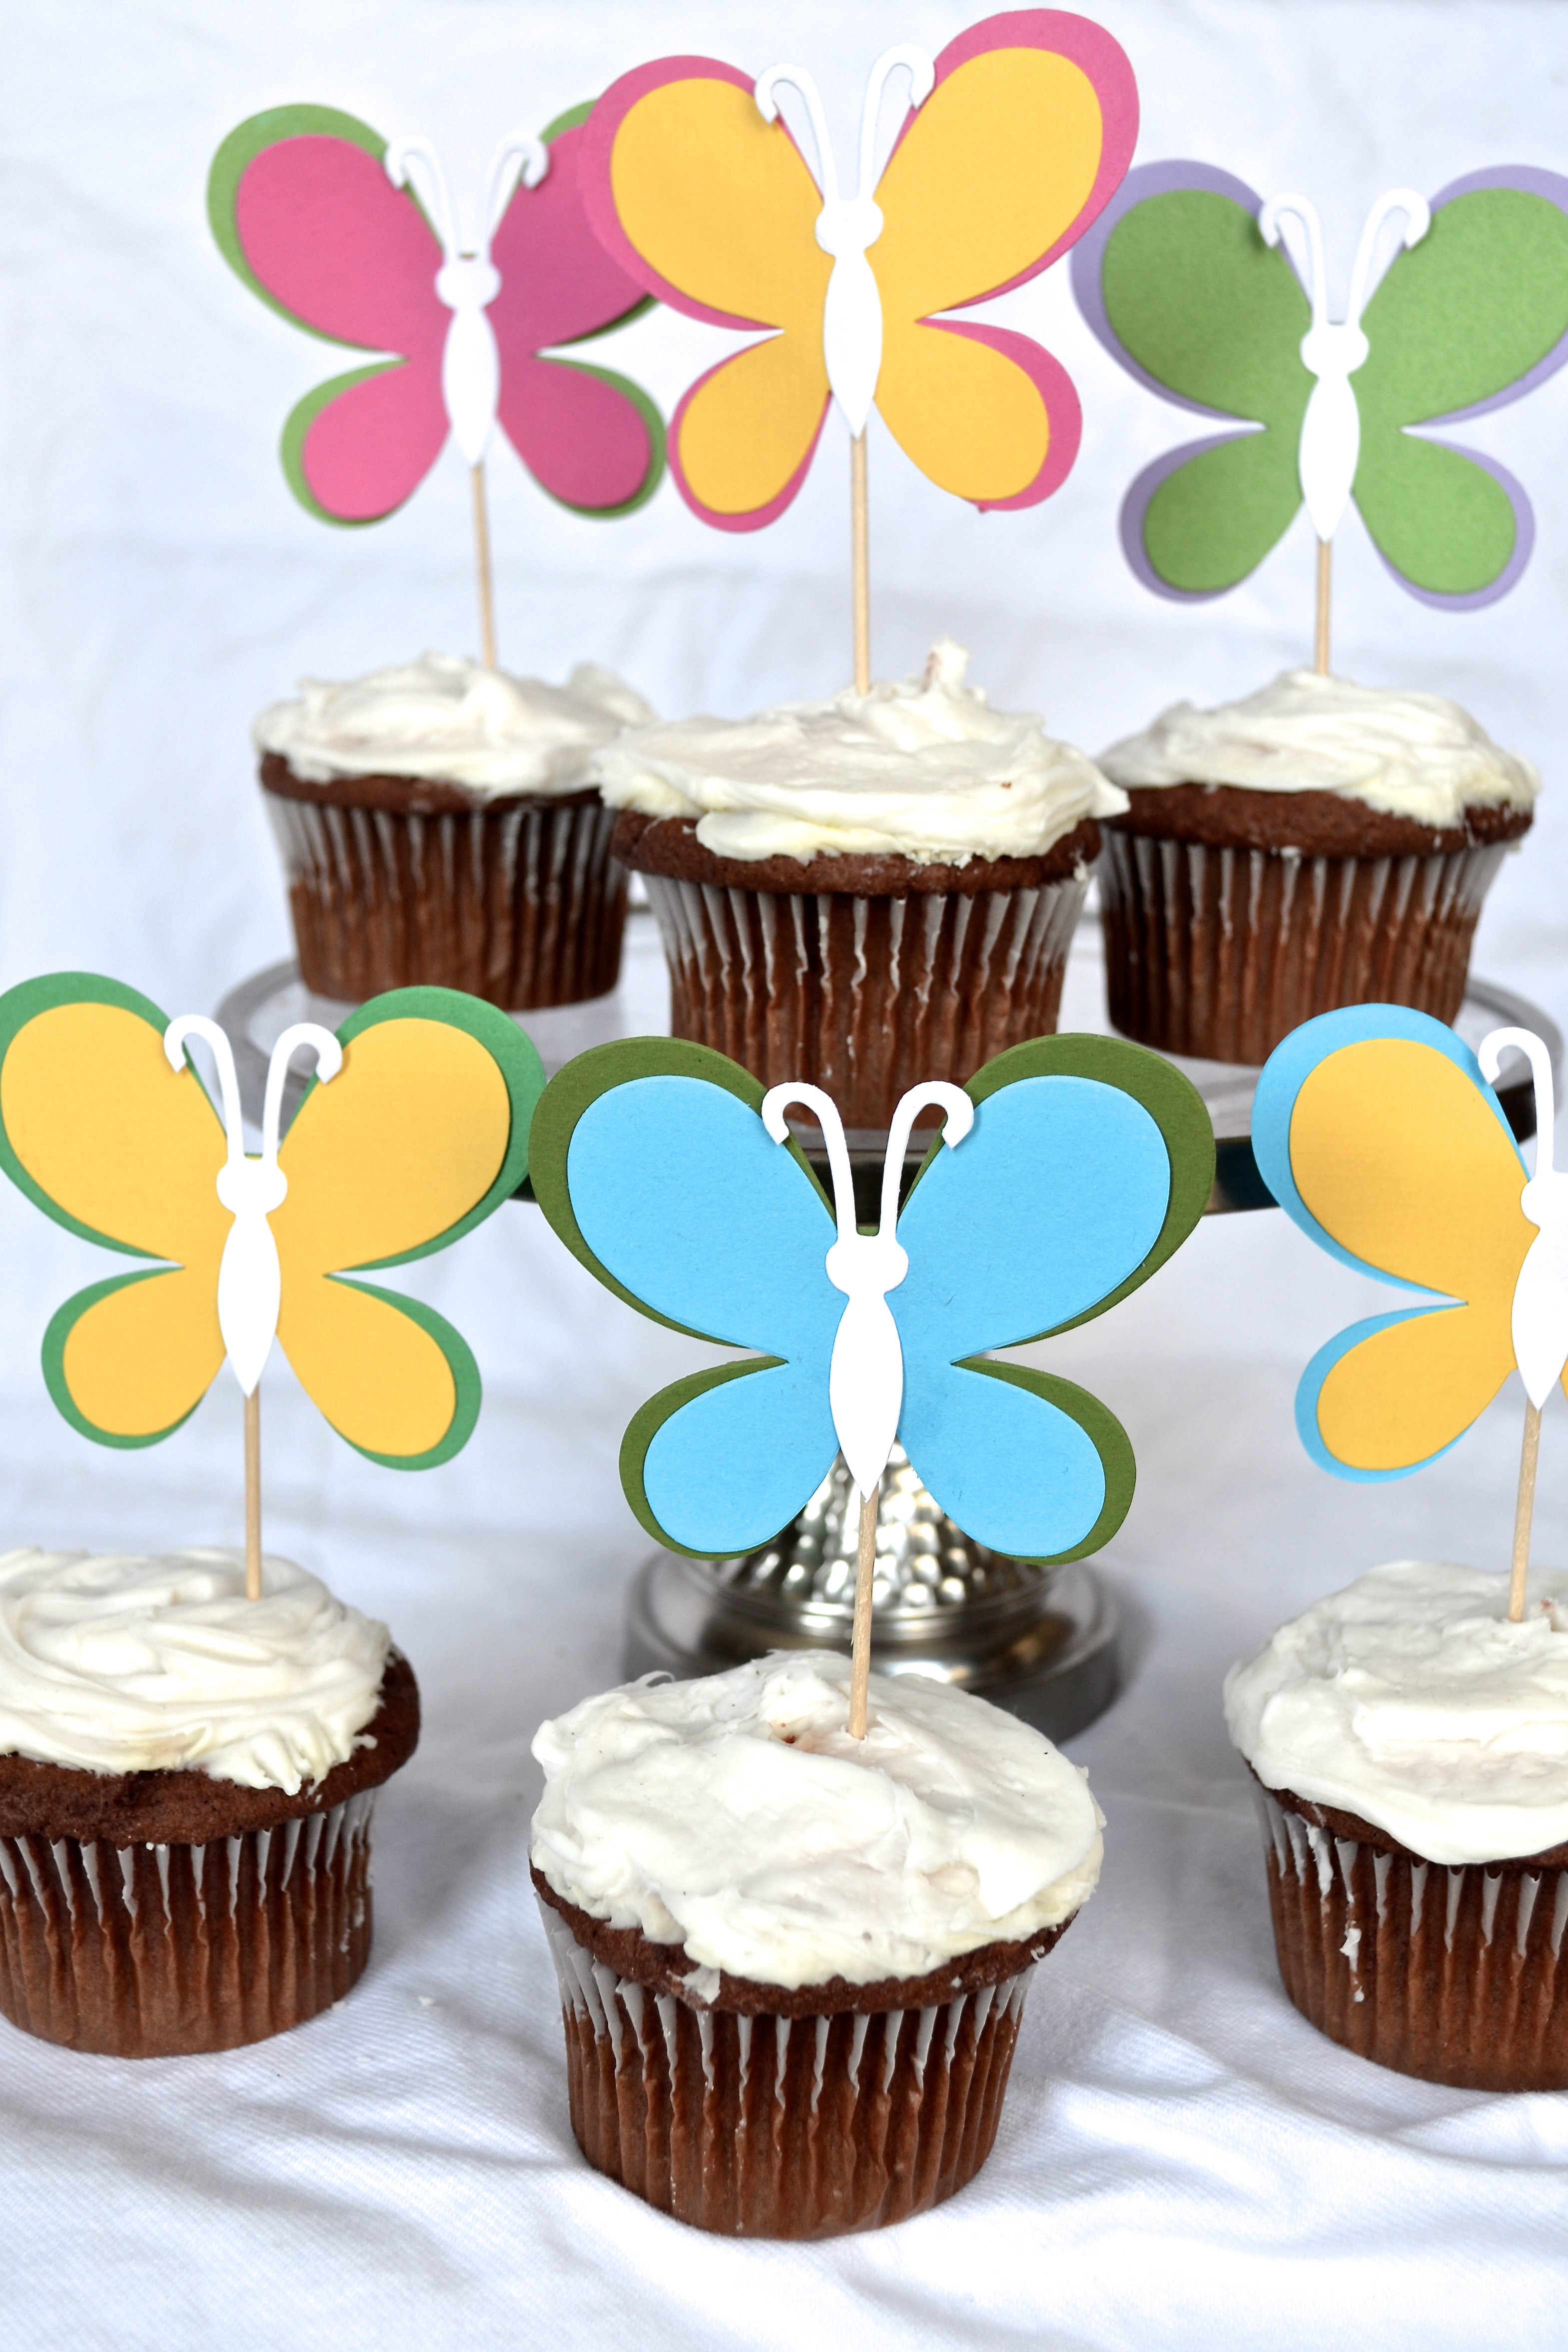
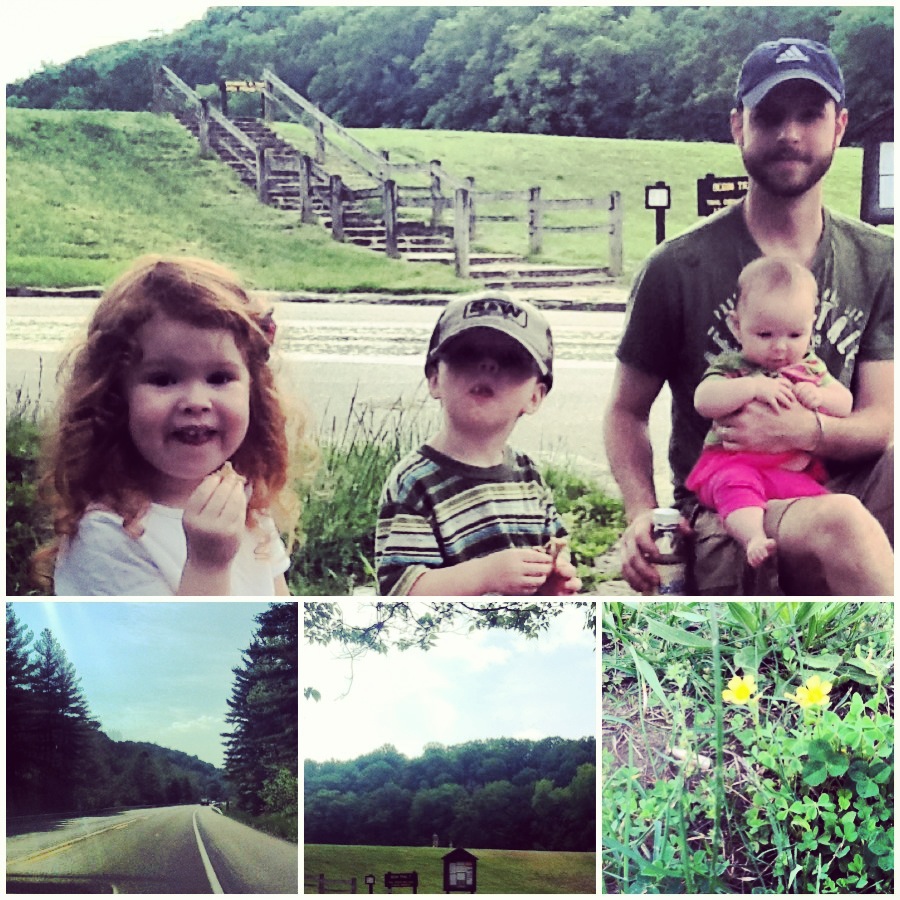
John had a week of vacation, and we spent most of it at home {or with my in-laws}. We did get away for an overnight, though! Brown County is Indiana’s largest state park, and quite lovely {and quite!} this time of year. We took the kiddos to Story Inn for the night, and then for a bit of an explore in the park itself the next day. They loved being on an “adventure” so much.IMG_2443 A sweet color combo! These purple and pink butterfly toppers are on their way to a baby girl’s first birthday party :)IMG_2445 And my baby girl just keeps getting bigger! She’s a roller now, and loves to roll her way across the room. She started out on the blanket in the lower right, and made it all the  way to my stash of baker’s twine on the other side of the sewing room. :)IMG_2446

How about you – you Instagram? What do you find shows up as a recurring theme in your photos?

Also, don’t forget to use the shop’s free shipping coupon if you’re planning on stocking up on any summer party goods! It expires tomorrow night, so don’t dilly dally too long :)

<3


a recap of love

a recap of love

Did you have a lovely Mother’s Day yesterday? I know it’s a joy-full day for some of you and a bittersweet day for others, and for some of you a day full of sorrow – whatever your emotion, I hope you were able to enjoy the spring day and soak in the ones you love <3

Mother's Day RosesOur Mother’s Day was full of family – both our imediate little brood {who woke up at 7, crying of course … the dreamed-of breakfast in bed might need to wait a few more years!} and my husband’s family.

As far as gifts go, there are two that are making me smile: last weekend John sent me to Lowe’s to pick out some flowers, and I brought home this lovely light pink Knock Out Rose, and it’s already blooming! I LOVE flowers, especially roses, and seeing this out in the yard from the kitchen window has definitely made me feel loved <3

And then yesterday afternoon I went shopping with two of my sister-in-laws for some summer wardrobe refreshers , and I found the sweetest white sundress {and it was 50% cheaper in the store than online – score!}.

Some of the reviews online say that they think it’s a bit short, but being a bit short myself I found it to be the perfect skim-my-knees length :) Now that I’m almost back to my pre-baby weight {notice I didn’t say “shape?”}, I’m really looking forward to wearing pretty little things again! And maybe John and I can go out somewhere? {Sweetie, that was a hint …}

But the best gift? The kiddos coming up to me throughout the day, throwing their arms around me and declaring “happy birthday, Mommy!” or “happy Valentine’s Day, Mommy!” or “guess what? I love you Mommy!” and then near the end of the day {when they were starting to get the hang of it} “happy Mom’s Day, Mommy!”. {melts me every time!}

Love to you all,

XO


customer love – proposal edition!

customer love – proposal edition!

.: photo curtesy of Brian C. :.

I was thrilled to be contacted by a customer a while back, asking if I could help him with an order that he was planning to use as part of his proposal{!} to his girlfriend. Thrilled is an understatement – because what girl doesn’t love a bit of romance? :)

His plan was to make up a batch of heart shaped pancakes and top them with several of my stamped heart toppers, both the “BE MINE” and “LOVE” versions. He contacted me a few weeks later saying that it had gone perfectly! I can only imagine how delighted she was to be greeted with the breakfast and declaration of his love <3

May Day

May Day

Happy May Day!

May Day giftsAren’t these kiddos just the cutest you’ve ever seen? ;) Of course, I might be just a little bit biased!

May Day gifts May Day is quite close to the end of our semester of Bible study, and I had the bright idea of combining a May Day goody with a teacher appreciation gift {two in one! score!} Yesterday the little ones made up some jumbo rice crispy treats {such a simple recipe that allowed them to “help”} to give to their teachers this morning, and then this morning I helped them package them up in some sweet little bags and sign their name to a note that I had written. As a finishing springy touch, I tucked a Butterfly Cupcake Pick in each and it was just the extra bit of color and “special-ness” that the gifts needed.

The goody bags were a hit! Of course, it would be a bit hard not to be thrilled with anything these cuties handed you {try not melting at those smiles, I dare you!} :)

Do you celebrate May Day? I’d love to teach our children about May-poles and posies next year – do you have any traditions or memories that you’d like to share?


<3


customer love – parties edition!

customer love – parties edition!

Each time a customer leaves a comment saying how much they love their purchase, it makes my day. I especially love it when they tell their friends and send me photos of how they have used the things that they have bought, and recently you lovelies have sent some super darling ones!
Here are a few of the most recent photos:

the red heart cupcake toppers in a fun filled owl and heart birthday – so cute!

aren’t the owls and hearts just darling together? 

It’s so simple to add a festive and patriotic touch to your desserts with the Red, White and Blue Star set – and even more striking with a miniature flag to top them off!

The red heart toppers again, this time for a little girl’s first birthday – love! The red is really striking against the colors of aqua, teal and yellow :)

The Red Heart Garland sweetening a display of photos from the baby girl’s first year – I love this idea!

the Star cupcake toppers again, this time adding a crisp and masculine touch to a little guy’s first birthday – can you see the little number “one” on the cake? I love how creative you all are!

She even used some of the star chair garlands to drape in front of {and in!} the super darling Birthday Boy vignette. Love this!

Do you have photos that you’d like to share? If so, you can either email them to me at elizabeth@pltmarket.com or tag them with #thepathlesstraveledmarket on Instagram – we’d all love to see your ideas!

Don’t forget -there are just a few hours left to save 20% using the exclusive coupon. It expires at midnight tonight! I hope you are all having a truly lovely weekend,

XO

Friday again?

Friday again?

How can it be Friday again already?

And Easter is almost here! Having it early this year means that’s it’s kind of catching me off guard {making the girls matching Easter dresses? um, might not happen …}. Are you finding the same thing true for you?

Each pick is made using rabbits cut from 5 different colors of cardstock: pink, yellow, light blue, light green and purple. Each is double sided so there isn't front or back - they look cute from every angle! Each little bunny is about 1/2" tall. The set includes: 3 yellow 3 pink 2 green 2 blue 2 purple

 Easter Rabbit cupcake toppers

Speaking of catching me off guard, I just realized that I haven’t done a very good job of moving most of my Easter items over from my Etsy shop to this site – whoops! So if you’re looking for the super cute things that I’ve been making {and trust me, there are some REALLY cute new things in my shop!} you’ll need to look there this year. Oh well ….

Anyway, here’s some of the cuteness:

Easter Bunny Bag from the Path Less Traveled

 Easter Bunny Bags {I’m in LOVE with this paper!}

Easter Egg Doily Garlands from the Path Less Traveled

 Easter Egg Doily Garlands

Pastel Bunny Dessert Topper from the Path Less Traveled

 Easter Bunny Mini Cake Bunting

Spring Doily Garland from the Path Less Traveled

 Spring Doily Garland

and those are only a few! I’m hoping to get them all posted here for you, too, but we’ll see how that goes. :) I’ll let you know!

For those of you who follow me on Instagram, you saw that I mentioned shipping deadlines for Easter delivery: the deadline for guaranteed delivery with standard shipping is Monday, March 25 and Priority shipping is Wednesday, March 28. If you need rush shipping, let me know and I’d be happy to help!

Hope you all have a lovely, lovely weekend {we are expecting snow …} and I’ll be back soon :)

XO

How-Tuesday: Party Ceiling Pouf

How-Tuesday: Party Ceiling Pouf

There has to be a better name for it, but for now I’m calling it “Party Ceiling Pouf” {really, any of you have suggestions? Let me know!}

image via Lindsay Meinhart on Pinterest

I found this photo on Pinterest a while back, and when we started working on the pink princess party, I knew it would have to happen. Of course, when I was making it I just winged it and didn’t click through to see if there was a tutorial for it. :) After I was finished I found out that wasn’t a tutorial {yay for figuring things out on your own!} but one of the commenters suggested cutting the table covers in half the long way to double your “streamers” – even so, I think it turned out really sweet!

Easy Party Ceiling Decor Tutorial

I picked up all the materials {except for the tissue poms which I borrowed from the kids’ bedroom :)} at the Dollar Tree, and the entire project came to $5 – a huge impact for a small price!

materials for a party ceiling pouf via the Path Less Traveled

 materials: plastic table cloth, wire star garland and thumb tacks {all pictured} tissue poms or balloons and twine or fishing line {not pictured}

instructions for party ceiling pouf via the Path Less Traveled

step one: remove the table cloths from the packaging and gather half of one end in your hand.

step two: find where you want the “center” to be, climb up on a step stool and tack it up …

instructions for party ceiling pouf via the Path Less Traveled

… like this.

step three: Gather and tack up the other side of the end, then do the same with the opposite end.

Repeat with the other three table cloths, making a “+” shape on the ceiling.

DIY Party Ceiling PoufOnce you’ve used all four table cloths, you can stop there or continue on like I did and add a touch of whimsy and sparkle {which, it turns out, thrills little 4-year old girls!} by adding strands of the star garland along the underside of the draped cloths.

Easy Party Ceiling Decor Tutorial

step four: gather your tissue pons {or balloons} and, using twine or fishing line, hang them in a bunch in the center to provide a focal point and hide the bunching :)

step five: step back and admire your work :)

that’s it! Super simple with a huge impact – and a great way to make your celebration special.

xo

her pink princess party

her pink princess party

Ah, little girls. When they love something, the LOVE it, all the way. And our little princess Emma Grace LOVES pink and princesses and parties. {when asked who her favorite princess is she has no answer – they’re all her favorite!} She doesn’t really care if they’re Disney or otherwise, but if it’s a princess or pink, she is in LOVE. :) The only thing better is when it’s a pink princess – Sleeping Beauty? Score! Arielle, who wears a pink dress and has “orange hair like me!” is quite wonderful, too :)

And so, when we started talking about her birthday a few months ago, just about the first thing out of her mouth was “princess! pink princesses” {and none of us were surprised :)}

DSC_0050

– a tiny gold tiara for our 4 year-old princess –

I made up a Pinterest board with party ideas, and the ones she liked best were {can you guess?} PINK and had princesses in the photos. I’m not a huge fan of licensed characters, so we picked out lots of things that were more “princess-ey” than Disney-ish to try. Out of her favorites, we picked a bunch of ideas, and a few of them actually got done :)

DSC_0065

-a tiny gold crown adorning one of her baby photos and the crown I made for her to wear-

DSC_0055

– lots of pink! the ceiling pouf idea {tutorial here} came from {this} pin, the materials from Dollar Tree and the tissue poms from the kids’ room –

DSC_0062

– ribbon and bell wands {our Emma Grace loves these} with lots of soft colors, and enough pink to make her very, very happy –

DSC_0175

– the dessert table –

pink lemonade, punch, {these cookies} and {these rice crispy treats}, the princess poster is from Dollar Tree

We decided to celebrate her day with family and as we were scheduling, realized that the best thing for everyone would be to gather on the evening of her birthday, a Tuesday, for desserts and cake. I did my best to make things ahead and then set aside her birthday to love on her and get the party ready, but ah, the best laid plans :)

We did lots of loving on her {each time I would snuggle her and say “happy birthday! you’re 4 now!” she’d say, “awe, thanks mommy” with the sweetest little smile :)}, but by afternoon nap time I was running a bit behind! My sweet sister-in-law came over to help me pull the loose ends together {thank you again, Sarah!}, but one of the things I forgot was to charge the camera battery – hence some of the detail photos {like of the desserts, the piñata before it got smashed …} didn’t get taken. You’ll have to use your imaginations. :)

the Path Less Traveled: cute little Princess

All in all, it was a very sweet party to celebrate the sweetest four year old princess ever – and she was delighted. Which was the entire point of the party!

She had soooo much fun “helping” to set it up {we are still enjoying some of the decorations – I’m kind of loving the extra pink in our house :)} and I enjoyed making the things and “shopping the house” to find the decor {I actually only spent about $9 on the decorations – can you believe that?! the rest we already had around the house – score!}.

DSC_0047

– favor bag tutorial {here} –

I have a few how-to posts planned for some of the decorations, so stay tuned! And I’d love to hear how you and your families do birthdays – do you go all out on themes? or sweet and simple with just a cake {or birthday person’s choice of dessert}?

How-Tuesday: Pink Princess Party favor bag tutorial

How-Tuesday: Pink Princess Party favor bag tutorial

the Path Less Traveled: Pink Princess Favor Bag tutorial

Hello everyone! Yep, it’s time for How-Tuesday again – and this time I’ll show you a {sort-of} tutorial on how I made these darling favor bags for Emma Grace’s pink princess party {I’ve got a few more posts about her party planned – it was so sweet!}. Ready?

I had seen {these and these} sweet treat bags on Pinterest and knew that they’d be perfect for sending the favors home with Em’s guests. {the favors were these molasses crinkle cookies – Emma Grace frosted them herself :)}

the Path Less Traveled: Pink Princess Favor Bag tutorial

 to start with I used a pair of scallop scissors to even off and pretty up the ends of some brown sandwich bags.

the Path Less Traveled: Pink Princess Treat Bag Tutorial

then I used my multi-stamp that I use for all the hand-stamped things in the shop and some pink ink to stamp some 4-inch doilies with “thank you for coming!”

the Path Less Traveled: Pink Princess Treat Bag Tutorial

next, I used a glue stick on the edges of the doilies and sprinkled them with some bright pink glitter {so girly and princessey!}

DSC_0049

the last step was to pop the cookies into the bags, layer the doilies on them, fold over the tops and secure with a staple {I was hoping to punch holes and tie them with pink twine, but I was running behind … my sister-in-law ended up doing this step for me. Thanks so much Sarah!}.

DSC_0047

There you have it! Some sweet, simple, glittery and pink favor bags for a pink loving princesses birthday party :)

I’m really looking forward to showing you the rest of the details from her party! <3